We love to incorporate my son’s toys in his learning. One of his favorite toys is called BEYBLADE. It has energy layers that unleashes a fast spinning top. You can battle with another person to see whose top spins longer. It is a fun toy for kids. Therefore, we thought it would be fun to play a word game for kindergarten using BEYBLADES.
View the bottom of this post for reading gear!
BEYBLADES AND LITERACY
In the game, you got a point for winning the BEYBLADE battle. You also received points for the amount of words you could make. The amount of points gained depended on the number of words you made.
I wanted to give my son, Cory, a challenge. Instead of putting letters together and have him identify words, I gave him random letters and asked him to make words. I participated by making words when he gave me random letters. He did a great job with this game. In fact, he identified some words that I missed when it was my turn.
We helped each other in this game. As a result, we competed against each other but worked as a team simultaneously.
Try this word game for kindergarten with your child. You can actually play it with children of all ages. You will have to adjust the game according to their level.
Below is a video showing you how to play the game. This video comes from my son’s YouTube channel, Corban’s Fun Learning Adventures. Please subscribe if you like what you see.
If you have a child that loves to read, check out the shirts below. Just click on the image. Adult sizes available too!
Valentine’s Day is around the corner. We love doing theme-based science experiments in our home. This year we decided to make a chemical love potion with ingredients we have on hand. This Valentine’s Day Science Experiment is fun and simple to do. Kids will be focused on creating a bubbly colorful potion, which is NOT meant to be consumed. Parents should do this activity with their children.
Kids and parents will learn patience while doing this Valentine’s Day Science Experiment. You have to use a specified amount of each ingredient in order for the chemical reaction to work. Once kids see the bubbly potion appear, they will be proud of their accomplishments.
Below is a video showing you how to make the love potion. We encourage you to follow the exact directions in the video.
One of the best ways for a child to learn is to incorporate what motivates them. My son is motivated by fun games. He loves winning and being competitive. Another thing that motivates him is his favorite toy, which are race cars. We needed to review multiplication, specifically the six times tables. Therefore, we created and played the Race Car Math Game.
Playing the Race Car Math Game
My son was so excited to play this game. He quickly got all the materials needed, which is listed below, for our competition. The rules were simple. You earn a point by having the fastest car and getting the multiplication problem correct.
We played this game for about one hour. At the end of the game, I was confident he knew his times tables. He was motivated to get the math problems correct because this was one way he accumulated points within the game. You can play this game with other math concepts such as addition, subtraction, and division.
Watch us play the game below. The video comes from my son’s YouTube Channel, Corban’s Fun Learning Adventures. Please subscribe and share if you like what you see.
Try this fun game with your children. If they like race cars, they are guaranteed to enjoy it.
My son loves to play with anything that launches or flies across the room. One of his favorite toys is the catapult. We built the catapult and played a fun game with it. It is more fun when you can actually make these types of toys. The benefits are numerous. For example, kids will understand how they work and can adjust them to their liking. Furthermore, children can make as many as they like and even give them out for gifts. We did this for the fun balloon project I will share with you in this post.
We call this project the Balloon Launcher. You only need five items, which you most likely have in your home. The process to making the launcher is very easy. You can play a game with the launcher to see who can shoot objects the farthest. The toy can be used at parties to celebrate another’s accomplishment or their birthday. Below is the process for executing this fun balloon project.
Below is a video showing you how to make the Balloon Launcher. This video comes from the YouTube Channel, Corban’s Fun Learning Adventures. Please subscribe and share if you like what you see.
Apples are in season this time of the year. I recently had a neighbor give me about 60 apples. This means making a lot of apple sauce for the family. In order to celebrate this time of year, my son and I made apples with homemade materials. Afterwards we created a mini explosion with the apples. This made for a fun fall activity for kindergarten.
Please note that kids younger and older than kindergarten age can do and have loads of fun with this activity.
My son liked this activity because he could get his hands messy with mixing the various substances. I like it because we made a chemical reaction and incorporated math by using measuring cups and spoons.
We consider this a great sensory activity for kids because they will mold the apple together using their hands. This is a fun fall science activity that you can do at home.
Below is a video showing you how to make the apples and the mini explosion. This video comes from my son’s YouTube Channel, Corban’s Fun Learning Adventures. Please like and share if you like what you see.
A time capsule is a container that you fill with items from the present day, such as school work, newspaper clippings, or small toys, and hide away to open on a predetermined future date. Putting together a time capsule is the perfect way to spend a cool evening or rainy day with the family. Read the details below to create your own time capsule.
First choose a time capsule container. A shoe box or large mason jar work great! Once you have your time capsule container you’ll want to figure out what you include. Consult the checklist below with your kids to help spark some good ideas. Make sure your kids choose items that won’t be missed too much. Remember, you’ll be hiding away the time capsule for some time.
Next have your kids write a fun note to their future selves! This can be a great way for them to capture their present interests and aspirations. The template below makes writing this letter easy. Just fill in the blanks! You can always add additional details.
Finally, you’ll want to set a date for when you plan to open the time capsule. This is completely up to your family! You can wait a few months, a year, or even a decade! Keep in mind the longer you wait, the more entertaining the reveal might be!
One day during snack time, I saw my son, Cory, put a spoon on the edge of his plate. On the spoon was one of his crackers. He took his finger and pressed the handle of the spoon causing the cracker to fly in the air. My first thought was to tell him to stop and eat; however, this time I realized he was doing a science experiment.
I told my son that he made his own catapult, which is used to throw objects over a far range. This is a great STEM project for kids to do. Afterwards, I went to the kitchen and gave him a cup. I challenged Cory to get the cracker in the cup with the catapult he created. He did that for about 20 minutes and then ate the rest of his crackers.
Whenever, Cory has an interest in something, I try to use it as a fun learning opportunity for him. The next day we went to the library and checked out the book called, Make a Catapult by Meg Gaertner. This book explained the science of catapults, how they work, and its various types. At the end, it showed us how to make one with materials we had at home.
The book grabbed Cory’s attention! He was most excited about making his own catapult. After creating the catapult, we played a competitive game to see who could get the cotton ball in the cup the most times.
Below we will show you in a video how to make a catapult.
How To Make A Catapult Easy
The video below comes my son’s YouTube channel, Corban’s Fun Learning Adventures. Please subscribe if you like what you see. We post fun hands-on activities weekly.
Have fun with this project! Encourage your kids to do more hands-on STEM projects. It helps them learn how things work and get their creative juices flowing.
Spring is here and this is a time for bubbles! The first time my son, Cory, saw bubbles he was a baby. He was so amazed at how they floated in the air and then disappeared (popped). Once he started to walk, Cory had a great time chasing the bubbles and popping them.
Now that my son is older, he likes to experiment with various types of bubbles. We don’t buy bubble solution from the store anymore because we make our own with various ingredients. We have made Giant Bubbles, small bubbles, Bubble Pipes, Unpoppable Bubbles etc.
My son wanted to do something new. He decided to create DIY Bubble Soap with layers on our dining room table. I didn’t know if it would work; however, it turned out to be a success.
Try this activity with your children. They will find joy in first, creating a bubble on a table. Then, they will be amazed at how they can create bubble layers. It became a fun challenge for my son.
This is a great science project for kids. They will see how three ingredients can be mixed together to create the bubbles one usually purchases in stores or online.
DIY Bubble Soap with Layers
In the video below, my son shows you how it is done.
This video comes from my son’s YouTube Channel, Corban’s Fun Learning Adventures. Please like and subscribe for more fun learning activities.
Letter Recognition and words are one of the first concepts children learn when starting school. Letter recognition can be perfected by singing the Alphabet song, reading books, watching educational shows, and by simply playing with letters. Children often become familiar with words by reading, spelling, playing word games, etc.
My son and I have used all the methods mentioned above to get him familiar with letters and words. This time we decided to do something different. We created a fun activity called the Blindfold Alphabet and Word Game.
This game starts out easy with letter recognition but then gets harder with spelling words. The unique part of this game is that you have to identify letters and words with a blindfold.
We had so much fun playing this game. There was a lot of laughter during this activity. This game is a great way to reinforce letter recognition, how letters are formed (which is beneficial for handwriting skills) phonics, and spelling.
My son and I made a video of us playing the Blindfold Alphabet and Word Game. We had a friendly competition. You will see us having fun while learning. Watch the video below to see who won the game. Have your children participate while watching by identifying the letters and words with us.
The video below comes from my son’s YouTube channel, Corban’s Fun Learning Adventures. Please like and subscribe for other fun learning activities.
“Can we do a science experiment?” This is what my 4-year-old son, Cory, asked me while walking in the grocery store one day. We just passed the aisle with vinegar, which is an item we use for many of our experiments. A week before, we did the Tooth Decay Experiment,which taught my son the importance of brushing his teeth twice a day. He had a lot of fun with this experiment and wanted to have that same feeling again.
So I turned to him and said, “Sure we can do another experiment. Do you know what experiment you want to do?” His reply was, “No, but we can look one up.” We did just that the next day and found the Walking Water Experiment. I was familiar with how to do it without instructions. However, I wanted my son to read the experiment instructions and follow directions. Science experiments are a great way to increase a child’s reading level.
Watch the video below to see how science experiments can increase a child’s reading level.
We looked in our kitchen for the materials needed to do the Walking Water Science Project. We had everything except food coloring. Cory was so excited to do the experiment that he requested we go to the grocery store to get it. When my son is excited to learn something new, I try to act on it as fast as I can. After we got home from the grocery store, we were ready to get started.
This is an amazing experiment to show how water can defy gravity with a capillary action. I will explain this at the end of the post.
Let’s Get Started With This Fun Rainbow Experiment!
Paper towels (six folded into a rectangular shape)
Directions:
Fill four glasses with water.
At first we only filled the glasses halfway, then we realized it is best to fill them up.
Cory pouring water in the glasses
Put a different color of food coloring in each glass.
Putting the food coloring in each of the four glasses.
Stir the food coloring and water in each glass.
Mixing the food coloring and water together.
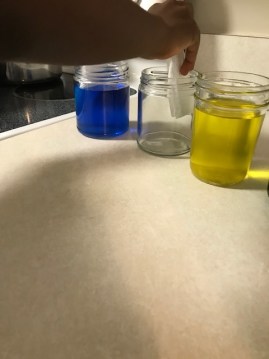
Place the glasses so there is an empty glass in between the ones with food coloring.
Alternating food coloring glasses with empty glasses
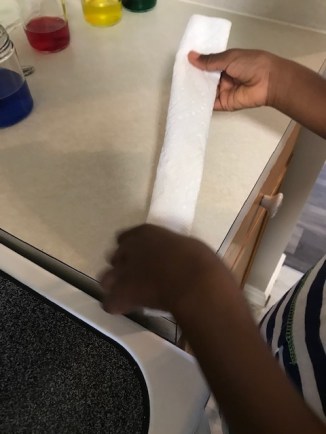
Fold six paper towels into a skinny rectangular shape.
Fold the paper towel like in the picture shown above.
Insert paper towels into two glasses placed beside each other.
Placing paper towels in cups. Here you can see we put more water in the glasses.This is how the paper towels should look. There should be two paper towels in each glass.The task is complete!
Let this sit for 24 hours and watch what happens.
This is what we saw the next day.
The empty glasses now had colorful water in them.
The glasses that were once full are now only a quarter full.
The water seeped through the paper towels and put water in the empty glass next to it.
Why this works:
As soon as you place the paper towel in the glasses, you should see that the it starts to absorb some of the water.
Water goes up the paper towel and defies gravity in a process called capillary action.
Paper towels are made of many small fibers that have gaps in between them.
Water gets pulled into these gaps by capillary action.
The water goes up the paper towel and down into the empty glass.
This is how water moves through plants.
Watch the video below to see how we did the experiment in real time. This video comes from my son’s YouTube channel, Corban’s Fun Learning Adventures. Please like and subscribe for fun learning adventures.